Remote work and cloud infrastructure have revolutionized productivity, but they’ve also introduced new risks. A larger digital footprint means more opportunities for cyberattacks, data loss, or accidental deletions. Prevention is critical, but when things go wrong, a robust backup system is your safety net.
CloudM Backup offers a dedicated, automated, and compliant solution to safeguard your data in minutes. Here’s how to get started in five simple steps:
Step 1: Set up your storage bucket in Google Cloud Storage
Start by creating a secure destination for your data backups. A storage bucket in Google Cloud Storage is where your data will be saved.
To create your bucket, you’ll need:
- A Google Cloud billing account
- Permissions to create or manage a GCP project
TIP: Automate the setup process using our PowerShell script for faster, error-free configuration. Full instructions are available in our Knowledge Base.
If you already have a Google Cloud Storage bucket, you can skip to Step 2!
Step 2: Assign permissions to your Backup admin
Designate a backup admin to manage and restore your data. For more control, create a new admin role with specific permissions. Permissions can be assigned via the settings page of your CloudM account.
Permissions to assign:
- Edit Backup Configuration & Policies
- Backup User Restoration & View Status
- Backup Shared Drives Restoration & View Status
To manage Organizational Units (OUs) and Smart Teams, assign permissions such as:
- Manage OUs
- Manage Smart Teams
- Manage Smart Teams Priority
- Manage Users
- View OU Hierarchy
TIP: Limit admin access by creating a role scoped to specific Organizational Units (OUs). Assign the role to users via the ‘Assigned Users’ tab.

Step 3: Enable domain-wide delegation for seamless access
Set up a domain-wide delegated service account to connect your Google Cloud Storage bucket and apply backup policies. This step ensures efficient API usage and uninterrupted access. Visit our knowledge base for detailed instructions.
Step 4: Connect your Google Cloud Storage bucket to CloudM Backup
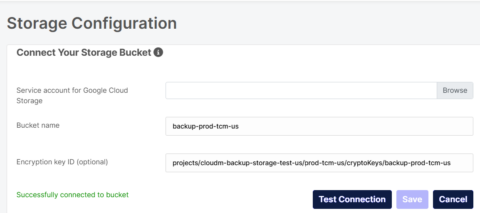
With your bucket ready, link it to CloudM Backup for synchronization. Simply navigate to the storage configuration page, select your bucket, and provide a Service Account key.
TIP: Test your connection to confirm everything works smoothly before proceeding.

Step 5: Create and assign your Backup policy
Craft customized backup policies to define what gets backed up and for how long.
- Navigate to ‘Create and Edit Policies’ and choose the policy type (Users or Shared Drives).
- Assign policies to OUs, Smart Teams, or Shared Drives as needed.
TIP: Regularly review and adjust your policies to stay compliant with evolving regulations.
Sit back and relax
With these five steps, you’re now backup-ready! CloudM Backup ensures your organization’s data is protected, compliant, and recoverable, providing peace of mind and reliable business continuity.
Book a call with our Backup specialists today


